Friedman BE-OD Pedal [traced]
-
bancika

- Resistor Ronker
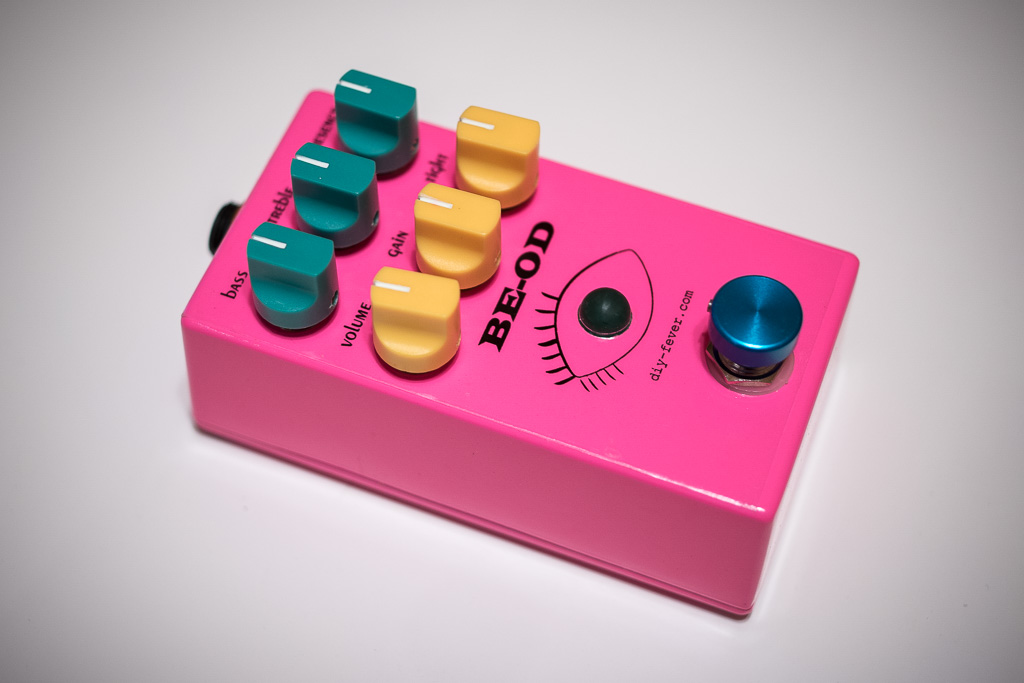
finally got to do the labeling on my Pink Eye build. The label is printed on the transparent foil they typically use for shop windows or car decorations. It's not perfect and you can see the foil under certain angle towards the light, but it's good enough.
The new version of DIY Layout Creator is out, check it out - https://github.com/bancika/diy-layout-creator
Check out my site with DIY gutars, amps and pedals http://diy-fever.com
Check out my site with DIY gutars, amps and pedals http://diy-fever.com
-
Cub

- Cap Cooler
Ah, Beauty!  That's a fine looking pedal. The big LED in the eye and that switch-topper really add a touch of class.
I didn't know about that foil printing trick, could you tell us a little more about that?
I didn't know about that foil printing trick, could you tell us a little more about that?
I wish I were a chestnut tree, nourished by the sun.
With twigs and leaves and branches and conkers by the ton.
With twigs and leaves and branches and conkers by the ton.
-
bancika
- Resistor Ronker
Thanks! The foil isn't much of a trick, it's pretty common technique, but it's probably not as cheap to do in western countries for one-off small projects as it is here in Serbia. I just prepare a design in Corel or other vector based software - one drawing for the cutout template, one for the print itself and take it to a local shop that has foil printer and cutter. We probably have a dozen shops in our town who do this stuff. They do it for cheap...in this case I got 4-5 of these for free because my friend sent it for me and he knows the guy who does it  Normally it would probably cost 2-3 bucks or something. The foil is decent quality and adheres well, it's made for shop windows and cars.
Here's an example for BE-OD, the red template is for cutter, black for printer. I put it on one drawing because it's monochromatic print, but they can print full color if I need so.

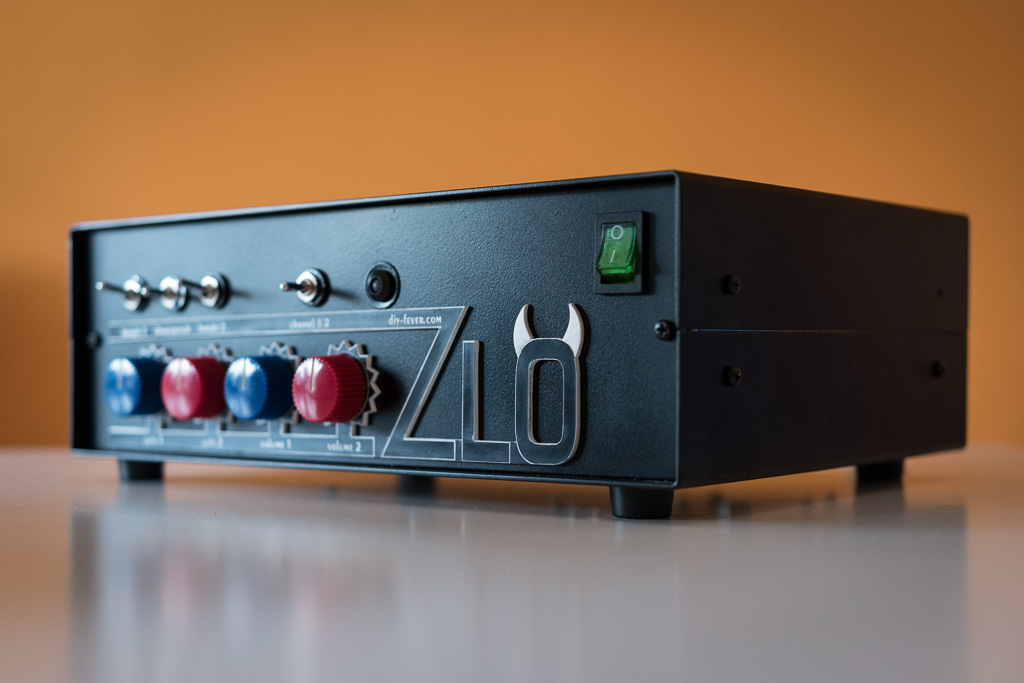
For amps I usually do plastic or plexi laser engraved faceplates which are also reasonably cheap. This one cost 10 bucks to do (Zlo means evil in Serbian and is a nod to SLO which I based this preamp upon). It would probably cost less if I didn't go for the "3D look" and just engraved a rectangular faceplate...but I think it turned out nice.
Cheers
Here's an example for BE-OD, the red template is for cutter, black for printer. I put it on one drawing because it's monochromatic print, but they can print full color if I need so.
For amps I usually do plastic or plexi laser engraved faceplates which are also reasonably cheap. This one cost 10 bucks to do (Zlo means evil in Serbian and is a nod to SLO which I based this preamp upon). It would probably cost less if I didn't go for the "3D look" and just engraved a rectangular faceplate...but I think it turned out nice.
Cheers
The new version of DIY Layout Creator is out, check it out - https://github.com/bancika/diy-layout-creator
Check out my site with DIY gutars, amps and pedals http://diy-fever.com
Check out my site with DIY gutars, amps and pedals http://diy-fever.com
-
Cub
- Cap Cooler
Thank you for explainging! They offer tinting at the local car-audio store, but I have no idea about printing.
That Zlo preamp looks amazing!
That Zlo preamp looks amazing!
I wish I were a chestnut tree, nourished by the sun.
With twigs and leaves and branches and conkers by the ton.
With twigs and leaves and branches and conkers by the ton.
-
bancika
- Resistor Ronker
These shops are not primarily car related. More like kinkos in the states...but less fancy and can do more stuff for less money they make ads, billboards, promo material, keychains, pens...you get the idea. Tinting foils are different and they probably don't print on those. These foils are more for logos like this

They usually do bigger projects in larger quantities than what I do, but I was turned down only once when I wanted to do custom printed grill cloth for a 1x8" cab...they typically print much larger mesh cloths and couldn't be bothered with my little project. But the rest was fine and cheap. Here are few more examples of what I did with laser
They usually do bigger projects in larger quantities than what I do, but I was turned down only once when I wanted to do custom printed grill cloth for a 1x8" cab...they typically print much larger mesh cloths and couldn't be bothered with my little project. But the rest was fine and cheap. Here are few more examples of what I did with laser
The new version of DIY Layout Creator is out, check it out - https://github.com/bancika/diy-layout-creator
Check out my site with DIY gutars, amps and pedals http://diy-fever.com
Check out my site with DIY gutars, amps and pedals http://diy-fever.com
-
caspercody
- Resistor Ronker
I used 1N457 diodes, and they work great.
Body GAINTA B013, polymer paint, printing on paper with a sticky layer, 3 layers of varnish.
Own Board, parts too: D I work in the wholesale supply of electronic components in Russia,so the cost of about $20, I do not remember exactly.
Inside 2 of the Board, the effect of "all aboard" and switching card. I hate soldering wires...
Own Board, parts too: D I work in the wholesale supply of electronic components in Russia,so the cost of about $20, I do not remember exactly.
Inside 2 of the Board, the effect of "all aboard" and switching card. I hate soldering wires...
- Attachments
-
Information
- Posts: 4
- Joined: 02 Mar 2018, 21:39
Can you post the layout with normal diodes, ThanksFrabbio wrote:Single sided layout for Dirty Shirley+Friedman BeOd in a box, this layout has the best of both worlds, there are 7 pcb mounted pots so you can build a BeOD with a mid control, or a DS with a tight knob, as said before the only notable difference is R16 in my schematic (10k for BEOD, 27k for DS).
I used through hole ICs this time, but i kept the smd diodes (BAV99). If somebody is interested i can post the same layout with normal diodes.
Board dimensions are 115x40mm, it should fit in a hammond bb enclosure.
Layout still unverified but it should work.
If you build it please report if everything is working as intended.
Good DIY!
Information
- Posts: 4
- Joined: 02 Mar 2018, 21:39
Thanks a lotFrabbio wrote:Layout with normal diodes in DO-35 package
Information
Hi all
Would really like to build the layout on this page
Postby Frabbio » 16 Jun 2018, 15:48
Layout with normal diodes in DO-35 package
Does any one have the component values for this layout? They dont seem to follow any of the schematics I have found
Thx Peter
Would really like to build the layout on this page
Postby Frabbio » 16 Jun 2018, 15:48
Layout with normal diodes in DO-35 package
Does any one have the component values for this layout? They dont seem to follow any of the schematics I have found
Thx Peter
Information
- Posts: 1
- Joined: 15 Jan 2018, 11:46
Good day everybody.
I made myself a BE-OD clone following the main schematic on this thread, in other words, the one where the presence control is most similar to the ProCo RAT's.
As with most other people who have been debugging and troubleshooting the schematic, I am experiencing problems with oscillation, particularly when turning the volume up at around 60-70% of the rotation. This is with all the other controls at noon, including the trimpot. I am using a 120pF capacitor rather than a 470pF.
I noticed that member bajaman's version adds a few components, and ties the presence control to the inverting input of the op amp stage with the trimpot. I have not tried this version, so I was wondering if anyone else has tried to A/B the two versions of the circuit to see which one was more prone to oscillation, etc.? I'm trying to figure out whether it's a layout issue, the wrong circuit or something else on my personal build.
I'm not sure if it's much help, but I'm posting a photo of my perfboard layout.

Thanks in advance.
I made myself a BE-OD clone following the main schematic on this thread, in other words, the one where the presence control is most similar to the ProCo RAT's.
As with most other people who have been debugging and troubleshooting the schematic, I am experiencing problems with oscillation, particularly when turning the volume up at around 60-70% of the rotation. This is with all the other controls at noon, including the trimpot. I am using a 120pF capacitor rather than a 470pF.
I noticed that member bajaman's version adds a few components, and ties the presence control to the inverting input of the op amp stage with the trimpot. I have not tried this version, so I was wondering if anyone else has tried to A/B the two versions of the circuit to see which one was more prone to oscillation, etc.? I'm trying to figure out whether it's a layout issue, the wrong circuit or something else on my personal build.
I'm not sure if it's much help, but I'm posting a photo of my perfboard layout.
Thanks in advance.
I do not think short wires will help too much. Original device itself has too much noise. And as i think, original pedal don't use wires, it use PCB mounted pots. Why it does not help than?!?Frabbio wrote:HI, you should keep your wires as short as possible, especially the input wire and the wires that go to the pots.
Just listen:
Only that helps to reduce NOISE is to use good shielded wires for IN/OUT etc.
-
Frabbio
- Breadboard Brother
The noise you can hear in the video mostly comes from the switching power supply.
Oscillation happens when there is some kind of signal feedback that goes back into the circuit, so you have to minimize interaction between different parts of the circuit.
High impedence lines are more sensible to external interference, so you have to shield especially the input to reduce this possibility. Keeping short wires on the pots is fundamental to reduce signal feedbacking into other parts of the circuit.
Obviously you have to pay attention to this when designing a layout, keeping a distance between sensible parts.
In my build i used pcb mounted pots but i didn't use shielded wires for in/out and i had no problems whatsoever
you think that the original pedal does not have a big amount of noise? That video shows the opposite and you claim that this comes from switching power supply not from pedal itself? Maybe but ...
Mate, YT is full of complaints about a HIGH NOISE that come from Friedman BE-OD. It cannot be that every user use bad power suply?!? There is one more video (2:30min):
Other pedals on test don's suffer from bad "switching power supply", only Friedman?!?
Judging by me, this is the pedal with the highest noise level on the market. Bad reputation for Friedman! BTW. only, if you reduce gain with the internal trimmer on1/4 turn, than pedal work great without annoying noise!
Mate, YT is full of complaints about a HIGH NOISE that come from Friedman BE-OD. It cannot be that every user use bad power suply?!? There is one more video (2:30min):
Other pedals on test don's suffer from bad "switching power supply", only Friedman?!?
Judging by me, this is the pedal with the highest noise level on the market. Bad reputation for Friedman!