Rockman X100 - Make it a DIY Pedal

All about modern commercial stompbox circuits from Electro Harmonix over MXR, Boss and Ibanez into the nineties.
User avatar
jarrodthebobo
Information
Posts: 37
Joined: 31 Aug 2019, 12:23
Been thanked: 6 times

Post by jarrodthebobo »

phatt wrote: 13 Nov 2020, 14:19 Maybe check your pins are correct against the data sheet,, as they are different to LM78xx series.
Great playing BTW :thumbsup and yeah,, close enough I'd stop tweaking for more top end as that will likely make it worse .
Phil.
Thanks man! Really fudged the Tooth and Nail solo though :lol: :lol:


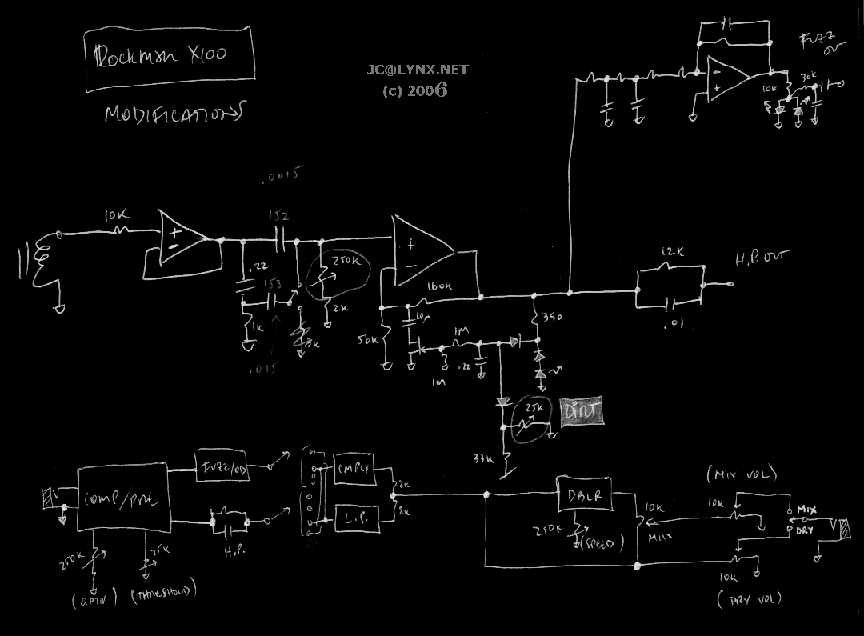
After hooking this thing up directly to my DAW that first time, I realized it really doesn't need any extra high end; the issue was running the cab sim through a cab itself; so like running a filter into another filter! Ended up sounding like a blanket was thrown over it, but not so much with the sim bypassed. More than enough high end available in this circuit.

For shits and giggles I also added the simple presence control from the Randall RG100es to the tone section after the rockman unit, and I like being able to turn down the high-highs while retaining the upper mids and lower highs :lol: . I do however, want to add some sort of active presence control utilizing NFB like in a 'real' amp, but am not 100% how to go about doing this. I always find presence to be an insanely underrated tonal control for guitar; and I find myself frustrated anytime I have to use a guitar circuit that doesn't utilize one.

For example; I have a small tube preamp I built based off of a 1968 superlead and Friedman topology. Initially its output was taken off a tube cathode follower, and no NFB was utilized. It sounded good, but missing something... so I kept redesigning the circuit over and over again, attempting to add NFB and a presence control from the cathode follower out, and creating a fake Phase Inverter stage to inject the NFB back into and yadda yadda yadda.... but I could never get it to 'feel' or sound the way the real one did.

Eventually, I ditched the 12ax7 output stage entirely, and added a REAL phase inverter, and a 6sn7 wired as a power tube, into a tiny output tranny. Boom; NFB and Presence control now easily obtainable, it only took 2 months of changing my tiny little diy build every single day, adding 2 additional tubes, and a freaking output tranny :lol: :lol: but I truly feel it sounds 'legit' now, and feels quite accurate to the real thing. Also, it can be used as a full 2-3ish watt amp if run into a cab so, pretty useful! Typically I just run it through a resistive load into my DAW though :mrgreen:

User avatar
deltafred
Opamp Operator
Information
Posts: 1654
Joined: 06 Apr 2010, 16:16
Location: England
Has thanked: 814 times
Been thanked: 306 times

Post by deltafred »

For 15v operation the preset will be set to 2k7 ohms (value taken from the data sheet). With a voltage of 13.75v across it (15v - 1.25v reference) which gives a power dissipation of 70mW. (P=V squared / R)

I don't know what power your pot can stand but I would use one with at least double that rating to be on the safe side.

The vero layout looks ok, the schematic is straight out of the data sheet with the added protection diode for large output capacitance. (Which you need with 4700uF caps splattered everywhere!)
Politics is the art of so plucking the goose as to obtain the most feathers with the least squawking. - R.G. 2011
Jeez, she's an ugly bastard, she makes my socks hurt. I hope it's no ones missus here. - Ice-9 2012

User avatar
jarrodthebobo
Information
Posts: 37
Joined: 31 Aug 2019, 12:23
Been thanked: 6 times

Post by jarrodthebobo »

deltafred wrote: 13 Nov 2020, 21:06 For 15v operation the preset will be set to 2k7 ohms (value taken from the data sheet). With a voltage of 13.75v across it (15v - 1.25v reference) which gives a power dissipation of 70mW. (P=V squared / R)

I don't know what power your pot can stand but I would use one with at least double that rating to be on the safe side.

The vero layout looks ok, the schematic is straight out of the data sheet with the added protection diode for large output capacitance. (Which you need with 4700uF caps splattered everywhere!)
I had the protection diodes backwards :horsey: so I guess I was making straight shorting diodes with how they were wired in!! I'm suprised the lm317 didn't blow. I've got a 10k pot in there now with a 10k 1 watt resistor across pin 1 and 3 just in case. It doesn't short any longer; no sparks, voltages remain stable, etc. So that issue is all solved.

Still need to figure out a cool little presence circuit though and maybe a way to implement the clean part of the circuit into this as well... I'm having issues reading the actual x100 schematics though in regards to the switches, and I'm assuming that the clean circuit is just bypassing the 3rd stage and running into a different eq section? There has to be more I'm missing though since taking signal off the output of the 2nd stage still gives a crunchy signal when I strum hard, so there's gotta be,some other resistors and caps shunting signal elsewhere...

User avatar
Jmpj48
Information
Posts: 32
Joined: 11 Nov 2016, 21:08
Has thanked: 1 time
Been thanked: 2 times

Post by Jmpj48 »

Do you have a layout for this?

User avatar
jarrodthebobo
Information
Posts: 37
Joined: 31 Aug 2019, 12:23
Been thanked: 6 times

Post by jarrodthebobo »

Jmpj48 wrote: 13 Nov 2020, 22:50 Do you have a layout for this?
I used 2 small veroboard things that are made specifically for chips such as these; 2 lines down the middle without any copper traces to separate the 2 sides of the chips, and then each pin had its own separate copper traces that diverged from one another in order to make soldering/resoldering easier. Great little boards for prototyping. 1 Chip is on one board, 2 chips are on the second board. A have a normal veroboard for the 2 Jfets used for the tone circuit.

Someone probably could put together an actually 'good' vero layout with this schem tho! It is relatively simple and isn't crazy on the parts count... but I'm terrible when it comes to layouts :applause:

User avatar
blackboarcult
Breadboard Brother
Information
Posts: 73
Joined: 28 Mar 2018, 19:18
my favorite amplifier: one that works.
Location: Norway
Has thanked: 92 times
Been thanked: 70 times

Post by blackboarcult »

If you post the latest schematic you used with voltages and updated values, I'd be more than happy to do a vero layout for this! Been waiting for ages for someone to come up with this project :-) Even though I had the X100 schematics, I didn't dare to do the experiment myself.
The soundclip sounds killer indeed, congrats!

User avatar
jarrodthebobo
Information
Posts: 37
Joined: 31 Aug 2019, 12:23
Been thanked: 6 times

Post by jarrodthebobo »

blackboarcult wrote: 15 Nov 2020, 12:22 If you post the latest schematic you used with voltages and updated values, I'd be more than happy to do a vero layout for this! Been waiting for ages for someone to come up with this project :-) Even though I had the X100 schematics, I didn't dare to do the experiment myself.
The soundclip sounds killer indeed, congrats!
I actually used the schematic that was posted on the 2nd page, and I don't think I really had to change anything in order to get the circuit functional. All I really did was re-route some of the grounds since I was using a single supply vs. split and then added an input cap. The other things that were changed and added were completely optional just because I can never stop tweaking things :applause:

I can try and trace out some voltages after work tonight, and maybe put together a little drawing of the tone section if people want it; but its pretty basic and just uses jfet buffers in order to supply the tone circuit, and then another one after the tone circuit just cause, haha. It's part for part a copy of the Randall RG100es tone stack (Well almost; I had to alter the pot and cap values because I had run out of the correct pot values, but everything I used was scaled down and matched using the duncan tone stack calculator so, nothing needs to be changed on the actual circuit to get the same tone circuit I used here).

I do have another update however; I just had some j201s finally come in to try and throw in the compressor circuit and oddly enough, it drops the gain quite considerably! I had used a gaggle of different jfets in this part of the circuit and had last been using an mpf102 which gave me quite a lot of rich distortion, but would oscillate with the gain knob turned up any higher than 1/4 on the pot. With the j201, I can turn the gain up all the way, but it never reaches the same amount of distortion that the mpf102 (or other like jfets I tested) used, and sounds a bit weak actually. This is odd considering the j201 is pretty close to the stock jfet 2n4339 spec wise, and the mpf102 is NOT at all. I currently threw a 2n5457 in the compressor spot and like it a lot more actually; still get the gobs of distortion but can turn the gain up to the half way point before the oscillations start. I'm not 100% sure if this has to do with how I'm biasing these jfets however, as I have a 1meg pot connected with 2 5.6meg resistors on the wipers to replace the biasing resistors... and this appears to affect the compression/gain levels to that stage, but I'm not sure if its doing it correctly as I cannot find any info on how to bias this section of the rockman.

User avatar
jarrodthebobo
Information
Posts: 37
Joined: 31 Aug 2019, 12:23
Been thanked: 6 times

Post by jarrodthebobo »

phatt wrote: 09 Nov 2020, 14:07 Hey Jarrod,
Just my observations,,
Change C112 from 12n down to 2n2 or similar that will flatten the mid hump.

Don't try grabbing more top end in this circuit,, You would be far better off hanging a tone stack on the end.
Also I agree with Mr BMXguitar the compressor is likely not that great so insert another in front or post cabsim.

I've had great results with Distortion > Compressor > Cabsim > tone stack > Amp.
But try out a different sequence to your taste.
my Cab sim is similar to the Rockman.
Phil.
Ended up adding a switch for this cap. In the circuit I put a 2nf, with a switch that parallels a 4.7nf, and 10nf cap. Has a GIANT effect on the sound, and flattens that hump quite a bit, as you said; but leads to it sounding rather scooped actually!

Here is a little demo: order of the sounds is 12nf, 6.7nf, and 2nf. I put some chorus on the sim after the first round of 3. EQ settings all at noon.


I actually really like the 6.7nf for rhythm stuff, and the stock value is really nice for leads. The 2nf value is way too scooped for me, but it's definitely useable when running the rockman on the cleaner side.

Also, I dropped my bias resistors to 1meg for the jfet and was able to throw in the j201 with pretty good results. Still less gain then the other jfets, BUT much more useable now (not weak sounding), and there is a lot more range on the gain knob when using the j201s vs the other jfets tested. Will be keeping it as is for now until potentially finding some 2n4339s.

p.s my multimeter needs some new watchcells :roll: , so I'll get those voltage readings and such for the layout once I get some more!

User avatar
phatt
Transistor Tuner
Information
Posts: 1224
Joined: 04 Aug 2010, 05:17
Location: Morayfield SE Qld AU
Has thanked: 8 times
Been thanked: 343 times

Post by phatt »

Hi Jarrod,
Regards the 6n8 cap setting.
Bare in mind C103 (1nF) rips of a massive amount of bass on the standard circuit,, as you do need to wipe a lot of lows when using heavy dirt,,,but if you lower C112 the bass loss is now way too much so if you raise C103 up to ~10nF that may help to balance the freq response.
I know with my Nobels SST1 unit I changed the input from 1nF up to 10nF and it was much fuller sound.
Off course I'm not chasing the same guitar style and Distortion that you play,,
I'm more old fart classic RR. 8) so just my thoughts as options for you.
The Nobels died years ago,,it just fell apart from battery corrosion and weak controls.

I eventually made my own circuits but used the cab sim from the Nobels SST as it just seemed to work for my style.
Compressor before distortion does not work for me so now I have 3 Dirt pedals then mictester's Optical Compressor and then Cab sim into a passive tone stack. That runs into an old Keyboard amp which has no guitar shaping just a flat response and that works very well.
I play live and it's a big sound for average size gigs.
I have other Valve Amps but those don't have the Bottom end punch that the old Laney Keyboard amp has.
Anyway happy tweaking,, Phil.

User avatar
jarrodthebobo
Information
Posts: 37
Joined: 31 Aug 2019, 12:23
Been thanked: 6 times

Post by jarrodthebobo »

http://www.lynx.net/~jc/x100modSchem.gif

Found this page with a potential mod to the compressor circuit to set the bias/compression amount; would this work?

I notice that this leaves in that additional diode and resistor going to V- (33k), and the 56k resistor is still before the 10uf cap, and not after it like suggested... and it appears that this is how it is on the actual board that he's using (x100)?

The compression circuit sure is weird in this thing and really mushes down the signal quite a bit, and in my experience can make the bass kind of farty in the way its compressing... Could this be due to the changes made in this redrawn schematic with leaving out the 33k resistor to V- and diode?

I'm going to be attempting to throw these mods onto my board real quick to see what the impact is...

User avatar
jarrodthebobo
Information
Posts: 37
Joined: 31 Aug 2019, 12:23
Been thanked: 6 times

Post by jarrodthebobo »

Update! Thrown together the compression circuit like how it is on that mod site above; but kept the 56k resistor on the leg of the transistor instead of before the cap. With the j201 the compression REALLY works! However, it works a bit too well as it is now; a ton of gain is lost in the initial attack and then it "ramps" up to full volume after about a second or so, even with that 25k pot turned up fully. With it lower, the compression only gets more and more aggressive. Using a 2n5457 now gives les gain reduction, but the compression feels more like an overall gain control (cool in its own right) then a true compression circuit. A 2n5484 however, sounds pretty killer in terms of overdrive, but the compression near dissapears at all settings (unless i use the full 24v on the supply voltage vs the 15ish I usually set it at). I'll be playing around with this further; being that the original circuit calls for a 2n4339 and the j201 is probably one of its closest equivalents, I'll likely try to tweak the above mods to match the j201. Perhaps I may have to increase one of the bias resistors (the 1megs in the modded schem, I assume) or increase the pot value past 25k?

Additionally, the extra diode and resistors that were removed from the redrawn schematic do appear to be doing "something" important in the compression circuit since adding them has greatly increased its useage.

I am however, completely uneducated when it comes to anything that isn't a tube gain stage so, jfets, opamps, and compression circuits are a completly different language that I'm still attempting to decipher.

User avatar
Carvindc125
Breadboard Brother
Information
Posts: 63
Joined: 08 Mar 2015, 21:22
Been thanked: 23 times

Post by Carvindc125 »

Hello,
I came across this thread as I have been wanting to make a pedal version of the Rockmans Clean2/Clean 1 tones. I see the Distortion/Edge, and it’s compressor and EQ have been worked out.
I would like to join you guys if you intend on sorting out the clean tones.
I just bought a nobles sst-1 actually they seem a little darker on clean tone but it was best I could do to reference the sound and prototype something.

User avatar
Carvindc125
Breadboard Brother
Information
Posts: 63
Joined: 08 Mar 2015, 21:22
Been thanked: 23 times

Post by Carvindc125 »

Also is there a complete schematic on the distortion section including where +6 and -6 is hooked up?

User avatar
phatt
Transistor Tuner
Information
Posts: 1224
Joined: 04 Aug 2010, 05:17
Location: Morayfield SE Qld AU
Has thanked: 8 times
Been thanked: 343 times

Post by phatt »

Carvindc125 wrote: 23 Nov 2020, 23:30 Also is there a complete schematic on the distortion section including where +6 and -6 is hooked up?
the Full Schematic is on the very first post. :wink:

Re the SST1 mockman it's close to the same,, as noted here by *Jarrod* he thought he needed more hi freq but ultimately found it was not needed.
ALL these preamp/pedal circuits are subject to what equipment you plug them into.
Hence someone raves about a circuit on the web and you go out and buy one and it's a pile of crud.

Also Be aware that most of the younger players are used to Digi systems which generally have too much hi freq content.

Which is most of the reason that folks who have drained their bank account buying all the raved about latest wizzbang DiGi gear still can't nail the old school guitar tones/sounds. [smilie=a_whyohwhy.gif]

If you want those old school sounds you need to limit bandwidth which is why the rockman was so successful. :secret:
eons ago I had a Quadraverb GT plus. top of the range at the time. 20/20 bandwidth yarda yarda wank wank.
It bugged the crap out of me,, always missing something.
Long story short;
I built a simple analog cab sim and placed it between the Qverb and my recording setup and BINGO,,, now it sounded like the classic Strat through a Marshall. :applause:
Even with all the DiGi Cab sims and many other tweaks it still had way too much hifreq.

And now years later every digi unit I've had the displeasure of playing through has too much HiFreq content which just turns an otherwise good setup into a harsh clangorous noise.

The art of great guitar tone is *Subtraction* not *Addition*
but everyone keeps adding more and more and get less and less.

If you care to listen to some Carlos Santana there is nothing much past 2~3khZ.
Hence that super sweet singing OD.
Even if you are into metal you may think you need the extra top end but as I've shown a few local lads a basic cab sim is a good building block, with careful tweaking through your signal chain can reap more pleasing results.
Phil.

User avatar
Carvindc125
Breadboard Brother
Information
Posts: 63
Joined: 08 Mar 2015, 21:22
Been thanked: 23 times

Post by Carvindc125 »

phatt wrote: 24 Nov 2020, 07:28
Carvindc125 wrote: 23 Nov 2020, 23:30 Also is there a complete schematic on the distortion section including where +6 and -6 is hooked up?
the Full Schematic is on the very first post. :wink:

Re the SST1 mockman it's close to the same,, as noted here by *Jarrod* he thought he needed more hi freq but ultimately found it was not needed.
ALL these preamp/pedal circuits are subject to what equipment you plug them into.
Hence someone raves about a circuit on the web and you go out and buy one and it's a pile of crud.

Also Be aware that most of the younger players are used to Digi systems which generally have too much hi freq content.

Which is most of the reason that folks who have drained their bank account buying all the raved about latest wizzbang DiGi gear still can't nail the old school guitar tones/sounds. [smilie=a_whyohwhy.gif]

If you want those old school sounds you need to limit bandwidth which is why the rockman was so successful. :secret:
eons ago I had a Quadraverb GT plus. top of the range at the time. 20/20 bandwidth yarda yarda wank wank.
It bugged the crap out of me,, always missing something.
Long story short;
I built a simple analog cab sim and placed it between the Qverb and my recording setup and BINGO,,, now it sounded like the classic Strat through a Marshall. :applause:
Even with all the DiGi Cab sims and many other tweaks it still had way too much hifreq.

And now years later every digi unit I've had the displeasure of playing through has too much HiFreq content which just turns an otherwise good setup into a harsh clangorous noise.

The art of great guitar tone is *Subtraction* not *Addition*
but everyone keeps adding more and more and get less and less.

If you care to listen to some Carlos Santana there is nothing much past 2~3khZ.
Hence that super sweet singing OD.
Even if you are into metal you may think you need the extra top end but as I've shown a few local lads a basic cab sim is a good building block, with careful tweaking through your signal chain can reap more pleasing results.
Phil.
Thanks! I did download the schematic on the first Post.
I noticed in the thread there is some confusion on the power power supply of the Rockman X100. It is Different than the original Rockman slightly.
The X100 did use a dual PSU but it was really weird. The + side was 6.4V 200ma the - side was 6.0v 200ma
The Nobels SST-1 and original Rockman (1982) used +\- 6.0 200ma across the board.
The Nobels SST 1-X Used the same PSU as the x100 If you plug in a rockman x100 power supply in a Nobels SST-1 (Youtube Rockman Nobels do this A LOT) It degrades the sound quality of the SST-1 Then they go "Well the Nobels don't sound quite the same next to the rockman" Im not sure why that happens other than that extra +.4V is making a difference.
You can make a dual power supply with those exact voltages which would involve using a Transformer, a full bridge rectifier, a few filtering caps and voltage regulators. The Center tap of the Transformer would be 0v. A guy in Portland Oregon makes the PSUs and fits them in a 1590B enclosure.
I couldn't find on here what was decided to power the circuit what did you do or will you do to power it in pedal form?

As for Tone I believe you are absolutely correct. Many factors outside of an effect pedal contribute to tone. No need to elaborate you know exactly what I mean.
Though both the Rockman and its clones do have the ability to produce an amazingly clean tone. I'm pretty sure this is due to the cab sim and the compressor built in.
Analog Cab Sims are really clever. I am just starting to learn how their circuits work. Gyrators the word!
in frequencies for classic rockers I think your right. Tom Scholz would boost 4khZ almost all the way up. But anything after that was flat or cut if I remember correct. That's probably why a lot of tone geeks say they hear a treble booster in the Rockman.
The clean up and ability to instantly impart that 80s compressed tone is what attracts me to the Rockman. That's what got me back on this forum after a decade of being inactive LOL. I have been trying to just come close to that tone for years now then I got the idea to make the clean 1 & 2 section of the rockman into a pedal. Lots of people want the distortion but the clean 1&2 to my ear's is an effect all on its on. Not quite a reverb, not quite a Chorus, I can only describe it as 80s clean tone LOL. Then of course it looks like you guys beat me to the pedal idea.
Anyway has the pedal been made yet or are we still in the breadboard phase?
Also I see there is talks about possible mistakes in the schematic. Is there a post with a summarized correction to those mistakes?

User avatar
Carvindc125
Breadboard Brother
Information
Posts: 63
Joined: 08 Mar 2015, 21:22
Been thanked: 23 times

Post by Carvindc125 »

I am looking at the full schematic and admittedly I am not used to looking at a schematic drawn in this way. The switches and routing to them is throwing me off and confusing me.
Is there anyway someone could be an amazing over achiever and Draw the schematic in sections like the edge, dst, and EQ1 was laid out below? I am trying to understand how it all fits together. Where the clean 1 &2 input/output is How the EQ1 & 2 fit in with the Echo Trigger/Stereo Echo, and Chorus and trying to understand if the compressor is in the clean and dst/edg side. or just the dst/edg side.
Thanks a million in advance! Sorry for such a silly request but I learned to read schematics on my own and have trouble with bigger ones.

TLDR?
Requesting the clean 1 & 2 sections (EQ2, Echo Trigger/Stereo Echo, and Chorus) be drawn in sections like the example below.
Attachments
Rockman_E_D_EQ1.png

User avatar
Carvindc125
Breadboard Brother
Information
Posts: 63
Joined: 08 Mar 2015, 21:22
Been thanked: 23 times

Post by Carvindc125 »

Edit:
In case this hasn't been discussed yet. It appears these guys were working on the same schematic thats in the OP.
Someone got the compressor working well along with the dist/edge section. They double checked values from a X100 and made several changes.
Some of these are WAY off from the schematic.
rcustoms wrote: 06 Aug 2016, 13:42
Yazoo55 wrote:With Fermusicman's help, it is now working correctly. I had to swap out 5 capacitors and he very kindly checked the correct values for me. Some of the values in the "official" schematics are definitely wrong. I was able to check the resistor values using the photo of the board on the Diystompboxes forum and where the values differed on the official schematic, I went with the ones in the photo. A number of the capacitors also have bands indicating their values - I had never seen capacitors like this before. I have put it all into a 1U rack which had been a KVM switch box. You can pick these up really cheaply off eBay.

There is a lot of compression which can be controlled by picking a bit softer and digging the pick in when you want the compression to really kick in. I have always wanted a Rockman so it was great finding the schematics here. It gave me the impetus to go ahead and build it.
please post the mistake values,thanks
Yazoo55 wrote: 08 Aug 2016, 10:05 These are the changed values I used. This is based on the "100 Board Components" list, page 7 of the X100 Rev 10 pdf.

R111 - 12K
R114 - 4M7
R117 - 3K9
R119 - 68K
R144 - 82K
R145 - 200K
R164 - 120K
R166 - 620K
R168 - 30K

C103 - 1N5
C103A - 0.22 uF
C106 - 0.22uF
C107 - 8N2
C108 - 27N
C118 - 0.1uF
C134 - 6N8
C136 22pf

User avatar
jarrodthebobo
Information
Posts: 37
Joined: 31 Aug 2019, 12:23
Been thanked: 6 times

Post by jarrodthebobo »

Carvindc125 wrote: 24 Nov 2020, 17:58 Edit:
In case this hasn't been discussed yet. It appears these guys were working on the same schematic thats in the OP.
Someone got the compressor working well along with the dist/edge section. They double checked values from a X100 and made several changes.
Some of these are WAY off from the schematic.
rcustoms wrote: 06 Aug 2016, 13:42
Yazoo55 wrote:With Fermusicman's help, it is now working correctly. I had to swap out 5 capacitors and he very kindly checked the correct values for me. Some of the values in the "official" schematics are definitely wrong. I was able to check the resistor values using the photo of the board on the Diystompboxes forum and where the values differed on the official schematic, I went with the ones in the photo. A number of the capacitors also have bands indicating their values - I had never seen capacitors like this before. I have put it all into a 1U rack which had been a KVM switch box. You can pick these up really cheaply off eBay.

There is a lot of compression which can be controlled by picking a bit softer and digging the pick in when you want the compression to really kick in. I have always wanted a Rockman so it was great finding the schematics here. It gave me the impetus to go ahead and build it.
please post the mistake values,thanks
Yazoo55 wrote: 08 Aug 2016, 10:05 These are the changed values I used. This is based on the "100 Board Components" list, page 7 of the X100 Rev 10 pdf.

R111 - 12K
R114 - 4M7
R117 - 3K9
R119 - 68K
R144 - 82K
R145 - 200K
R164 - 120K
R166 - 620K
R168 - 30K

C103 - 1N5
C103A - 0.22 uF
C106 - 0.22uF
C107 - 8N2
C108 - 27N
C118 - 0.1uF
C134 - 6N8
C136 22pf
Just made some of these changes for shits and giggles; they make a pretty significant difference in terms of how the gain staging 'feels', and its a very GOOD thing. 100% make these component changes.

User avatar
Carvindc125
Breadboard Brother
Information
Posts: 63
Joined: 08 Mar 2015, 21:22
Been thanked: 23 times

Post by Carvindc125 »

jarrodthebobo wrote: 24 Nov 2020, 20:48
Just made some of these changes for shits and giggles; they make a pretty significant difference in terms of how the gain staging 'feels', and its a very GOOD thing. 100% make these component changes.
Unfortunately that guy was only interested in making the Distortion/Edge circuit into a pedal so he only confirmed that section.
I can only deduce that given that many wrong values discovered in just that section the entire schematic is probably peppered with wrong values

User avatar
jarrodthebobo
Information
Posts: 37
Joined: 31 Aug 2019, 12:23
Been thanked: 6 times

Post by jarrodthebobo »


Boom; got a clip!

Post Reply