Himmelstrutz - Fetto  [traced]

General documentation, gut shot, schematic links, ongoing circuit tracing, deep thoughts ... all about boutique stompboxes.
User avatar
ben_allison
Information
Posts: 22
Joined: 24 Apr 2010, 17:42
Been thanked: 1 time

Post by ben_allison »

So if I wanted to try other FETS, what resistor(s) would I want to remove, and where would I connect a trimpot for biasing, on this "stripped down" layout?

R4, 7, & 10?

Image

User avatar
jallenshaw
Breadboard Brother
Information
Posts: 57
Joined: 15 Jan 2012, 11:27
Has thanked: 7 times
Been thanked: 6 times

Post by jallenshaw »

I would replace r3/6/9 (12k's) with 20k to 50k trimmers....mind the pinouts of other FET's

FWIW, I have built 2x Fettos, and the 2SK170BL is best to my ears, and the 12k is perfect....no trimmers needed.
They can be had on eBay for reasonable cost if you shop carefully.

JAS

User avatar
crw414tele
Information
Posts: 44
Joined: 31 Jul 2013, 00:47
Has thanked: 16 times
Been thanked: 15 times

Post by crw414tele »

Just looking at the vero [ non-stripped] , would any of the dip switch selections benefit from being outside ? Maybe the voice or gain ?

User avatar
ben_allison
Information
Posts: 22
Joined: 24 Apr 2010, 17:42
Been thanked: 1 time

Post by ben_allison »

jallenshaw wrote:FWIW, I have built 2x Fettos, and the 2SK170BL is best to my ears, and the 12k is perfect....no trimmers needed.
They can be had on eBay for reasonable cost if you shop carefully.
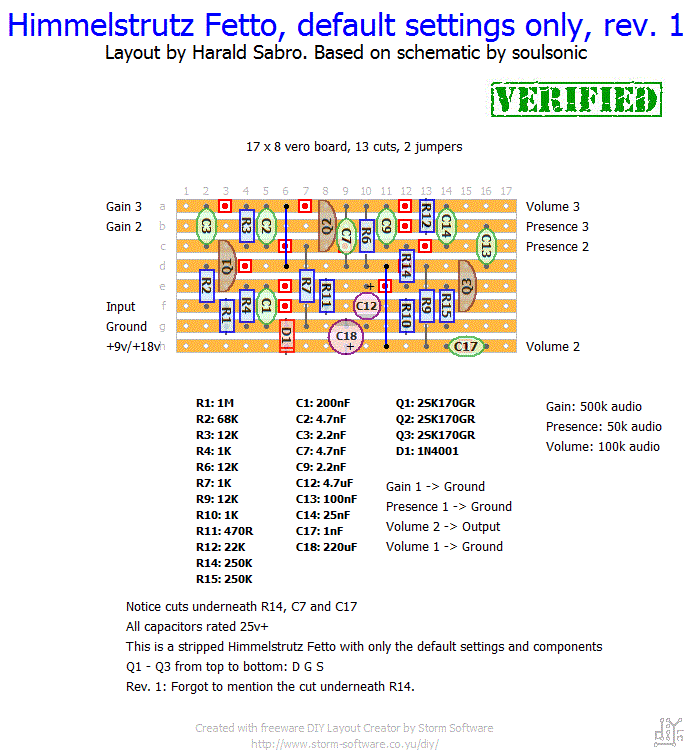
Nice! I might not bother then. From what I can tell, it's kinda like the DLS meets the Riot, but better.

Another question for anyone who's able to answer: on the Fetto Custom, there's a bass and treble control. Any pointers for incorporating that into this stripped down layout?

User avatar
ben_allison
Information
Posts: 22
Joined: 24 Apr 2010, 17:42
Been thanked: 1 time

Post by ben_allison »

I'm thinking either this Bax eq which I've done a layout for here:

Image

Or this one from Mr Orman:

Image

User avatar
ben_allison
Information
Posts: 22
Joined: 24 Apr 2010, 17:42
Been thanked: 1 time

Post by ben_allison »

So I want to make a PCB for the minimal layout (that is, all default settings).

I'm basing it off of this vero layout:

Image

Would someone mind looking at my adapted schematic to help verify it's correct?

Image

User avatar
pamaz
Breadboard Brother
Information
Posts: 71
Joined: 14 Jan 2008, 19:55
Location: Italy
Has thanked: 32 times
Been thanked: 10 times

Post by pamaz »

Sorry, I've not checked the schemo yet, but the first thing i see is that you are basing it out of j201 fet. Mind that 2sk170 have a different pinout than the j201. And 201 in this circuit are not a good choice.

User avatar
crw414tele
Information
Posts: 44
Joined: 31 Jul 2013, 00:47
Has thanked: 16 times
Been thanked: 15 times

Post by crw414tele »

Just finished this yesterday , awesome pedal . I used matching 2skr170bl and all 3 biased at 4.4v with the 12k resistor and 4.6v with 13k which is where I left it :horsey:

User avatar
ben_allison
Information
Posts: 22
Joined: 24 Apr 2010, 17:42
Been thanked: 1 time

Post by ben_allison »

pamaz wrote:Sorry, I've not checked the schemo yet, but the first thing i see is that you are basing it out of j201 fet. Mind that 2sk170 have a different pinout than the j201. And 201 in this circuit are not a good choice.
Of course! Oversight on my part. Put in the correct trannies.

User avatar
ben_allison
Information
Posts: 22
Joined: 24 Apr 2010, 17:42
Been thanked: 1 time

Post by ben_allison »

Assuming my adapted schem is correct, here's the work-in-progress of the PCB!

It's my first ever attempt at laying out a PCB, so go easy! :)

Image

User avatar
pamaz
Breadboard Brother
Information
Posts: 71
Joined: 14 Jan 2008, 19:55
Location: Italy
Has thanked: 32 times
Been thanked: 10 times

Post by pamaz »

Just as a suggestion, I would set larger solder pads. For sure it can be made smaller, but since it is fitting a 1590b, it's not bad at all.

User avatar
Intripped
Cap Cooler
Information
Posts: 671
Joined: 25 Aug 2009, 01:03
Location: Italy
Has thanked: 991 times
Been thanked: 305 times

Post by Intripped »

also, try and make all the traces as big as the one for +9V - in this way it's much easier to obtain a DIY nice and functional PCB. good work anyway!

User avatar
ben_allison
Information
Posts: 22
Joined: 24 Apr 2010, 17:42
Been thanked: 1 time

Post by ben_allison »

Larger pads, no problem!

I can make a version with larger traces too! I was planning on getting a few of these made up but a version that's easy to etch at home is a great idea. :)

User avatar
ben_allison
Information
Posts: 22
Joined: 24 Apr 2010, 17:42
Been thanked: 1 time

Post by ben_allison »

Updated the PCB. It's not as pretty, but it should be easier to DIY. :)

Also, here's a version ready to etch. NOTE: this is assuming my schematic is accurate. Still need a few people to take a look at help make sure it's verified (again, it's based off of the simplified vero, which simply eliminates the trimmers and headers, leaving only the components necessary to achieve default settings).

http://roestudios.com/dump/fetto-minimal-board-bare.jpg

User avatar
ben_allison
Information
Posts: 22
Joined: 24 Apr 2010, 17:42
Been thanked: 1 time

Post by ben_allison »

Realized that when I increased the traces, I ended up with some orphaned ground plate.

Image

The JPG of the PCB and the DIY-ready version have been fixed.

Really hoping to get someone to help me verify so I can build this bad boy. :)

User avatar
batteryacidtea
Breadboard Brother
Information
Posts: 104
Joined: 18 Feb 2009, 03:42
Has thanked: 57 times
Been thanked: 18 times

Post by batteryacidtea »

What is this solder pad floating alone on the left, bottom side of the pnp?

User avatar
ben_allison
Information
Posts: 22
Joined: 24 Apr 2010, 17:42
Been thanked: 1 time

Post by ben_allison »

batteryacidtea wrote:What is this solder pad floating alone on the left, bottom side of the pnp?
A victim of Photoshop! That's the input. DIY version fixed. :)

User avatar
Frabbio
Breadboard Brother
Information
Posts: 81
Joined: 27 Jul 2010, 13:25
Has thanked: 11 times
Been thanked: 97 times

Post by Frabbio »

Hi, nice pcb. You should enlarge the pads using the restring parameters in eagle, you can find them in the lower part on the left sidebar. A good value is 16-18 for the bottom for diy etching.

User avatar
hotguit
Breadboard Brother
Information
Posts: 69
Joined: 12 Sep 2007, 17:55
Location: earth
Has thanked: 4 times
Been thanked: 4 times

Post by hotguit »

Hi
Where can i find the diy ready version?
Thank you
hotguit

User avatar
2weiund2wanzig
Information
Posts: 4
Joined: 12 Sep 2015, 07:58
Has thanked: 3 times

Post by 2weiund2wanzig »

Hi,
Im a beginner-grade-solder and electronics guy.
The stripped fetto is my second pedal build (after tremulus lune - which works nice) and i have a BIIIIG Problem.
I soldered everything together and plugged guitar and amp in and i only have some very loud and "popping" sound when i strum very hard and all pots turned to maximum.

What makes me crazy is:
I checked everything twice, even desoldered, tested every part and soldered a new stripboard --> same Problem.
I bought a 10 pack of "cheap" chinese 2SK170BL labled k170bl. I checked them with the AVR transistor testerhttp://www.mikrocontroller.net/articles ... English.29 and they seem to be okay. It says: N-JFET; I=1.1mA; Vgs=0.80V (independently how i test them (SGD or DGS))
After the first problems i used little sockets instead of soldering the jfets to the board. When they are assembled i have only 0.7v on all three Drain and 0.7v on all three Source. (When i take the jfets out i have about 8.5v on the Drain Sockets --> so no Problem on the voltage rails)
The schematic http://revolutiondeux.blogspot.de/2012/ ... rtion.htmltells me there should be about 6.5v on the Drains. But why do i only have 0.7v?

I feel like getting crazy and really need some experts help. I fear its just a little mistake and every will work nice %)

Post Reply